

Paska Easter Bread is a centuries-old Ukrainian tradition, baked for Easter to celebrate renewal and spring. This rich, buttery bread is infused with bright citrus flavors, making it a fragrant and festive treat.

There’s something so special about the tradition of baking bread for Easter (hello, Hot Cross Buns!). But especially when it’s as beautiful and delicious as Paska. This traditional Ukrainian Easter bread is soft, lightly sweet with a kiss of citrus, and covered in sweet lemony glaze. With its vibrant, colorful sprinkles, it might just steal the spotlight from your Easter basket this year.
I had always wanted to try making Paska, and when I finally did, it took me by surprise. The first bite tasted familiar – rich and buttery, much like classic brioche but shaped like a panettone. Like most yeasted breads, it’s so delicious with a generous spread of salted butter. Traditionally, it’s served with a custard-like cheese called Hrudka or a drizzle of honey, but honestly, it’s just as lovely on its own.

Paska Origins
Paska is most commonly associated with Ukrainian culture, where it has been baked for centuries as part of Easter celebrations. Its name comes from the word “Paskha,” which means “Easter” in many Slavic languages. It’s a cherished part of Easter traditions, symbolizing renewal and celebration. Often baked in tall molds (or even coffee cans!) for a distinctive cylindrical shape, Paska is enjoyed all across Eastern Europe. You may recognize other variations like Russia’s Kulich and Poland’s Babka. Some versions incorporate dried fruits or almonds. Others keep it simple with a bright citrus zest, like the recipe I’m sharing today.

Make the Sponge
Creating a sponge is an important first step in making Paska bread. It helps to develop flavor and ensure a light, airy texture. Start by dissolving the yeast in warm water until bubbly, then mix it with warm milk, sugar, and flour. Let it sit in a warm place for about two hours, until doubled in size. It should almost rise to the rim of the bowl and wobble a bit when you shake it (see video for action). This pre-fermentation step gives the bread a wonderful depth of flavor and a perfect rise.
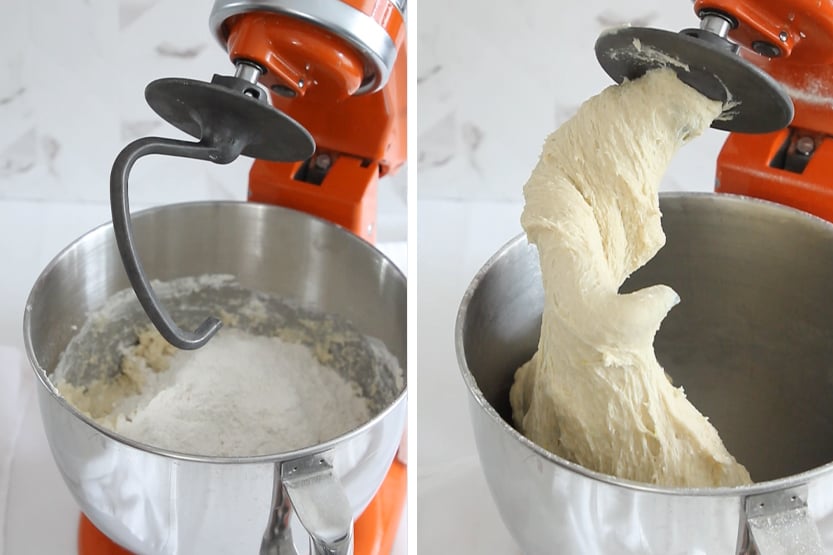
Make and Knead the Paska Dough
Once the sponge is ready, combine it with beaten eggs, sugar, butter, salt, and fragrant lemon zest in a stand mixer. (You can also do this the old fashioned way – by hand with a wooden spoon.) Gradually mix in just enough remaining flour to form a soft dough. You may not have to use all of the flour. Be careful not to add too much or the crumb will be dry. Knead the dough using a dough hook until it becomes smooth and elastic. (Or by hand on a floured surface for about 10 minutes.)

Let the Dough Rise
Place the dough in a greased bowl, turning it to coat, and cover it with plastic wrap. Let it rise in a warm spot until it doubles in size, about two hours. After punching it down, allow it to rise again for another 30 minutes. This double rise gives the bread longer fermentation, which improves the yeasty flavor.

Shape into Loaves and Bake in Molds
Divide the dough into two equal portions. As I mentioned earlier, traditionally, Paska is baked in tall, cylindrical molds. But I used traditional paper panettone-style molds featuring the “XB” symbol. This stands for “Christos Voskrese”, which means “Christ is Risen” in Slavic languages. You can find the ones I used for purchase right here.
If you don’t have molds, you can simply shape the dough into rounds and place them on a parchment-lined large baking sheet. Let them rise until puffy, about 30-40 minutes. Before baking, brush the tops with an egg wash to achieve a deep golden, glossy crust. Bake at 350°F until golden and fragrant, about 45-50 minutes. The first time I made these, I wasn’t sure they were done in their centers because they bake up so tall. To be sure, use a probe thermometer to test the centers. The bread is fully baked when it reaches an internal temperature of 190°F. Mine were perfectly cooked in about 50 minutes.

Once Cooled, Glaze and Sprinkle
Once the loaves have cooled completely, drizzle them with a simple glaze made from confectioners’ sugar, fresh lemon juice, and milk. Scatter rainbow nonpareils over the top before the glaze sets. Some bakers like to use a portion of the dough to form a cross on top before baking, which adds a symbolic Easter touch. But this version keeps things simple and colorful. And I’m sure absolutely no one is surprised that this is my favorite topping!


The flavor of Paska Easter bread is slightly sweet, rich with eggs and butter, and beautifully bright from the citrus zest. It’s best enjoyed fresh on the day it’s baked, paired with butter or jam alongside your Easter meal. If you have leftovers, then use the Paska for the most amazing French toast the next morning!
Related recipe: Italian Easter Bread

Paska Bread
Sponge
- 2 ¼ teaspoons active dry yeast
- 1/4 cup warm water 110°F
- 1/4 cup granulated sugar
- 1 1/2 cups warm milk
- 2 cups all-purpose flour
Dough
- 3 whole large eggs beaten
- 1/4 cup granulated sugar
- 1/2 cup butter at room temperature
- 1 teaspoon salt
- 2 tablespoons lemon zest
- 6 cups all-purpose flour
Egg Wash
- 1 whole large egg
- 1 tablespoon water
Glaze and topping
- 1 cup confectioners’ sugar
- 1 tablespoon lemon juice freshly squeezed
- 1 tablespoon milk
- 2 tablespoons rainbow nonpareils
Make the sponge
-
In a large bowl, dissolve the yeast in warm water (110°F) and let sit until foamy, about 5 minutes.
-
In a large glass measuring cup with a pour spout, combine the warm milk and 1/4 cup sugar; stir well to dissolve, then let cool down to barely warm. After cooling, add milk mixture to yeast mixture along with 2 cups of flour. Mix well with a wooden spoon. Cover and put in a warm place until the mixture is doubled in size, about 2 hours.
Make the dough
-
Add the sponge to the bowl of a stand mixer fitted with the paddle attachment. Add in the beaten eggs, ¼ cup sugar, 1/2 cup butter, salt, and lemon zest. Mix on low speed until well incorporated. Gradually add remaining flour a little at a time to form a soft dough. You may not have to add all of the flour.
-
Switch to the dough hook attachment and knead dough on medium-low speed until soft and elastic, about 8 minutes. Place dough in a greased bowl; turn to coat. Cover the bowl with plastic wrap. Let rise in a warm place until doubled, about 2 hours. Punch down the dough and let it rise again for 30 minutes.
-
Divide dough in two equal pieces. Shape each piece into a round loaf and place each in a 15 oz. paska or panettone mold. You can also line a baking sheet with parchment and bake them without a mold. Let them rise until doubled in size, about 30-40 minutes.
Egg Wash
-
In a small bowl, beat 1 egg with 1 tablespoon water.
-
Use a pastry brush to apply the egg wash to the tops of the loaves.
Bake
-
Preheat the oven to 350 F.
-
Transfer the loaves to the preheated oven and bake until deep golden brown, 45 to 50 minutes, or until the internal temperature reaches 190F. If the tops brown too quickly, tent them with foil.
-
When done, remove and let cool on wire racks to room temperature.
Glaze
-
In a small bowl, combine the confectioners’ sugar, lemon juice, and milk. Stir until a thick glaze forms. The glaze should be thick yet fluid enough to drizzle. If too thin, add more confectioners’ sugar; if too thick, add more milk a few drops at a time.
-
Garnish the loaves with the rainbow sprinkles while the glaze is still wet. Let set 15 minutes for the glaze to crust. Enjoy immediately.
-
Serve slices toasted or warmed with honey or butter on the side. This bread is wonderful alongside an Easter feast, and unglazed, can be used to sandwich slices of your Easter ham.
Flour Content: It’s very easy to add too much flour to the dough – so be judicious. Adding too much will result in a dry crumb. Add just enough to create a soft, unsticky dough. You may not have to use the entire 6 cups of flour.
Coffee Can Paska: Baking Paska in coffee cans is a great way to achieve its traditional tall, cylindrical shape without needing special molds. Choose large metal coffee cans that are oven safe, meaning no plastic lining and BPA-free. Grease and line the cans with parchment paper. Fill the cans with dough no more than 1/2 full. Let rise and bake as directed. If the tops brown too quickly, tent them with foil. Glaze and sprinkle when cool.